Meaning of Ardha Halasana
- Ardha = half
- Hal= Plough
- Asana= yoga pose
- It is a Sanskrit word that means half plough pose, and in Hindi, अर्ध हलासन.
- It resembles the Indian plough a little bit.
- It is the best yoga pose to treat and heal digestion-related issues. It is also known as the Upward Stretched Legs Pose.
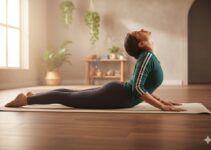
- One can get the maximum benefits of half plough pose when Bhujangasana is practised immediately after Ardha Halasana.
- It is the beginner-level posture that can also be used as a warm-up yogasana.
- It is suitable for preventing many health-related diseases such as indigestion, improper blood circulation, reproductive system, etc. That’s why it is included in the therapeutic yoga module.
- This is a crucial yoga pose for the Common Yoga Protocol of International Day of Yoga.

How to do Ardha Halasana Steps
The straightforward technique of this pose is explained here.
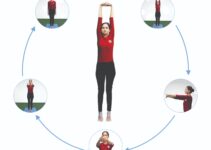
- Take a supine position, hands by the sides of thighs, palms resting on the ground.
- Slowly raise your legs together without bending at your knees and stop at a 30° angle.
- After a few seconds, raise your legs to a 60° angle and maintain the position.
- Now, slowly raise the legs at a 90° angle.
• Maintain this position for as long as comfortable.
• Slowly bring your legs down.
• This is the one round. Do 3-4 rounds to get more benefits. This is the final position of the Ardha halasana. - Maintain this position for as long as comfortable.
- Slowly bring your legs down.
- This is the one round. Do 3-4 rounds to get more benefits.
Ardha Halasana benefits
- Weight loss: The half-plough pose helps to lose weight, primarily ensuring belly fat burning. Secondly, bring your legs down slowly, which quickly burns belly fat. If somebody desires fast weight loss in the belly, he has to maintain the posture adequately.
- Indigestion: The practice is beneficial for those who are having indigestion and constipation. It is one of the best yoga poses to treat digestion problems naturally.
- Diabetes: The regular practice of the pose helps prevent diabetes.
- It also manages control of piles.
- Appetite: It helps to enhance your appetite.
- Strengthen muscles: It helps to strengthen thigh and calf muscles.
- Makes reproductive organs healthy: The pose stimulates the various lower body vital organs such as the ovary, testes, kidney, gall bladder, etc.
Ardha Halasana Contraindications
In the following conditions, this yoga pose shouldn’t be practised.
- Cervical spondylitis
- Spine stiffness
- Hypertension
- Cardiac problem
- Back pain
- Abdominal injury
- Hernia
Anatomy
The following muscles benefited from this yoga pose.
- Core
- Hamstrings
- Lower back
- Pelvic
Preparatory poses
- Seated forward bend pose
- Bound Angle pose
- Supine spinal twist pose
- Reclined big toe pose
Follow up poses
- Shoulder Stand pose
- Viparita Karni
- Sirsasana
- Halasana
Counterpose
- Bhujnagasana
- Shalbhasana
- Chakrasana
- Dhanurasana
Modifications and variations
Doing a plough pose can be easy for many practitioners, but many beginners may need help performing the pose. In such conditions, one should do the first stick asana followed by the Raised Leg yoga pose (Uttanpadasana). For aged people, it is better to perform by raising a single leg alternatively. Sometimes, keeping legs straight at 90 degrees seems complicated; here, one can do it with the help of a strap or rope.
Precautions
- While practising the pose and getting maximum benefits, it is better to point the fingers upwards.
- The legs should be straight and stretched.
- Ensure that your back is entirely on the ground.
- It shouldn’t be practised during pregnancy.
- For those with back pain, performing on a single leg is better.
Breathing
- Inhale while raising the legs at 90 degrees.
- Slowly inhale and exhale while maintaining the pose. But one thing should be kept in mind while inhaling: one’s entire focus should be on the breathing mechanism.
- Exhale; bring your legs slows down.
- And have a rest and do another round.
Advice for beginners
- Beginners should do it with some precautions.
- All of a sudden, raising both legs may cause back pain and abdominal cramps.
- It is better to practice first by raising a single leg alternatively.
- One can practice raising the legs at 30 degrees, too.
- The yoga expert consultation can also be taken.
Duration
- Initially, it can be practised for 10 to 30 seconds.
- Gradually, the duration of maintaining the pose can be increased.
- For maximum benefits and therapeutic reasons, it should be maintained longer per one’s capacity.