Headstand yoga poses, though challenging to perform, can show negative impacts if performed incorrectly. However, on the other side, it has incredible health benefits. As per the ancient texts, it is known as the ‘King of Asanas,’ but it seems to be over-estimation as all the asanas have significance. It shows invigorating impacts from toe to head. It supplies well-oxygenated blood to the brain and is the single yoga pose directly impacting the pituitary glands. It is pronounced as: ‘Shir-sa-asa-na.’
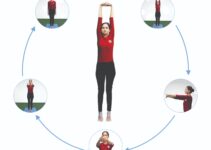
How to do a headstand pose safely
- Spread a fourfold blanket on the floor and kneel near it.
- Interlock the fingers so that the palms form a cup.
- Rest the crown of the head on the blanket so that the back touches the palms cupped.
- Now try to raise the knees from the floor by moving the toes closer to the head
- Exhale; lift the legs simultaneously off the ground with bent knees.
- Stretch the legs and stand on the head.
- Maintain the pose as long as possible and come down slowly better by bending the knees.
- A beginner should do the headstand with the help of a friend or in a corner where two walls meet, placing the head some 2 to 3 inches from either wall. All these increase the safety measures while practising the pose.
Headstand pose benefits
- Headstand Pose is the king of all asanas.
- Thinking power increases, and thoughts become more apparent.
- Sirsasana is a tonic for people whose brains tire quickly.
- Ensures a proper blood supply to the pituitary and pineal glands in the brain.
- Beneficial in case of loss of sleep
- Enhances memory and vitality
- Relieves colds, coughs, tonsillitis, foul breath, and palpitations.
- Cures constipation.
- Improves haemoglobin count
Top facts about headstand pose
- It can give many benefits if done correctly; however, it can cause more harm than good if practised incorrectly.
- It is the asana, which requires gradual development and mastery.
- Strange though it may seem, sirsasana is not mentioned in well-known yoga scriptures/texts.
Contraindications
It is not advisable to practice Sirsasana in the following conditions.
- High blood pressure
- Low blood pressure
- Cardiac issues
- Coronary thrombosis
- Arteriosclerosis
- Conjunctivitis
- Chronic glaucoma
- bleeding in the head
- Otia
- Chronic catarrh
- Slipped disc
- Kidney problems
- Headache & migraine
Precautions
- Try to align the body vertically in the final stage.
- Body weight should be supported on the head instead of the arms.
- Better to perform at the beginning of the yoga session.
- One shouldn’t perform in case of tiredness.
- It shouldn’t be practised as an intense workout.
- No during pregnancy and menstruation
- In case of excessive perspiration, it should be stopped immediately.
Safety
- It should be done correctly; otherwise, it can injure the tender muscles and bones of the neck.
- A certain amount of weight on the neck and head is safe.
- Fast kick-up and kick-down may cause strains, fractures, and neurological complications.
- It should be practised under the guidance of an experienced yoga teacher.
Duration
The beginner shouldn’t think about duration; the focus should be on practice and perfection. Try to hold it for 10 to 20 seconds as time passes and gradually increase the period. Those who have mastered the pose can maintain it for 20 to 30 minutes or even an hour.
Counter pose
- Tadasana
- Triangle pose
- Standing Spinal twist pose
- Shavasana
- Stick asana
Art of Falling
Before starting the headstand yoga pose, you should ensure you know how to fall correctly. Even the practitioners who have been practising sirshasana for years can fail. If you fall forward in the same direction as your face, you should fold the knees into the chest as much as possible. The impact on the floor should be sustained by the feet only. If you fall backwards, that is, behind the head, then the back should be arched as much as possible. The impact again should be sustained by the feet. No part of the back should hit the floor before the feet.
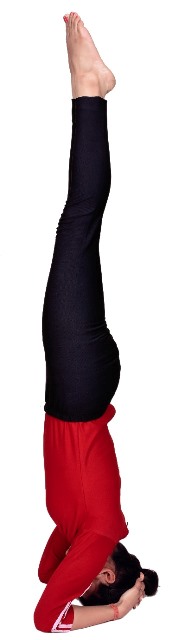
Correct position of the head
There are many views on this. Some yoga experts say the forehead must rest on the floor, while others say the top of the head should rest. From my point of view and what I have learned from my yoga teachers and gurus, the best head position is midway between these two extremes. That is, the head should be placed so that a point midway between the forehead and the top of the head rests on the blanket.
Position of the hands and arms
The fingers of the hands should be interlocked behind the back of the head. The hands should be wrapped around the head and not be placed under the authority. The hands should be adjusted so that they firmly support the head.
Warning
The legs shouldn’t be swung upwards as it leads to imbalance. While raising the legs, focus on controlling movement by contracting the back muscles and slowly readjusting the balance position.
Suggestions
Initially, it is better to practice with the help of a wall. Progress carefully, and don’t strain yourself if you don’t mind. Please don’t practice if you have any severe ailment; please don’t practice immediately after taking food.
Points to remember
- Don’t move the head or arms at the final stage.
- In case of imbalance, try coming to the original position as soon as possible.
- The body should be vertical in the final stage. No backward, forward, or sideways movement.
- At the final pose, the focus should also be on the muscles’ relaxation.
- Legs should be relaxed to ensure free blood flow toward the brain.
Returning to the ground
After attaining the final position, come to the starting position by doing the stages in reverse order. The body should be lowered slowly and with control. Body drop should be done slowly and systematically. It should be so that when the feet touch the ground, it makes no sound.
Breathing
Breathe deeply and then hold your breath as you lower the body to the starting position. In the starting position, breathe in. Hold your breath while raising the body to the final pose. Breathe slowly and deeply in the last part.