What is camel pose?
Camel pose is a kneeling, back-bending yoga pose with in-depth health-beneficial potential. Its importance has been excessively discussed among scientists during the COVID-19 pandemic because of its role in immunity. Camel pose has been a powerful yoga pose for immunity development, expansion of lungs, clearing of respiratory congestions, treating asthma, etc., accordingly, given much more thrust during the pandemic. Today, we will discuss the easy, simple steps and procedures to achieve maximum benefits from the practice of Ustrasana.

Origin
Ustrasana is a Sanskrit word wherein ustra means ‘camel,’ and asana indicates ‘posture.’ The posture has been mentioned in Sritattvanidhi. Krishnamacharya, Pattabhi Jois, and BKS Iyengar have also said it. It is also part of Bikram yoga. The posture has been prominently covered in the International Day of Yoga protocol.
Variations and Modifications
Practising camel pose requires time and stamina, especially for beginners. However, with regular practice, one can perform it perfectly. If you are facing difficulties initially, it is better to start its variation Ardha Ustrasana or half camel pose, wherein one keeps one’s hands on the hips instead of the heels or soles. One can also perform it with the support of bricks or wooden cubes.
Important facts
- It is pronounced as ‘oosh-TRAH-sah-nah.’
- It is a Kneeling backbend pose.
- It is known to open the Anahata (Heart Chakra).
- It targets the core.
- The pose is known for its physical and mental benefits.
- It counteracts the sedentary lifestyle by pushing the spine in the opposite direction.
Benefits
- Relives back pain
- Improves spinal flexibility
- Good for respiratory problems and congestion.
- Removes fatigue
- Overcome sitting postural defects.
- Burns belly fat
- Strengthens the thighs
Easy ways of doing camel pose
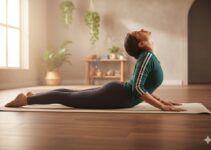
- Kneel on the floor by keeping one foot apart between your knees.
- Your feet are straight, keeping your toes pointing back and resting on the floor.
- Inhale, bend backwards slowly, and exhale; place the right palm on the right heel and the left palm on the left heel.
- Maintain the pose as long as you can with normal breathing.
- Inhale and come to the original position
Precautions
- The thighs should be vertical to the floor
- The arms and legs should evenly support the weight of the body.
- Hips should be pushed forward and open your chest as much as possible.
- Neck should be relaxed.
- Your arms should be straight while touching the heels or soles.
- Keep your head hanging down.
- If somebody has a stroke, skip to pulling down the head; instead, put some pressure on your neck muscles.
- It should be practised when the body gets warm as the spine experiences adequate stretching.
Contraindications
- Severe back issues (lumbago)
- Thyroid (enlarged)
- Hernia
- Low blood pressure
- Back injuries.
- back injury
- Neck injury
Beginner tips
A beginner should start practising Ardha ustrasana first. Instead of keeping their palms on the sole, they can use blocks. One can also perform it with the help of a chair. While using a chair, try to catch the chair’s back legs. The use of props is also recommended in the initial phase. Using cushions below your knees also makes its practice easier.
Muscular Anatomy
The muscles that are involved during its practice.
- Hip flexors
- Psoas muscle
- Trapezius
- Rectus femoris
- Vastus lateralis
- Hamstrings
- Sternocleidomastoid
- Deltoid
- Pectoralis major
- Rectus abdominis
- Pectoralis minor
Awareness and duration
Maintain awareness of breathing and relaxation of the whole body. It is difficult to stay in the final pose for more than a few minutes. Aim at eventually maintaining the asana for up to two minutes. Initially, hold the final pose for no more than a few seconds, increasing the duration by a few seconds daily.
Sequence
This is a backwards-bending asana. As such, it should follow or precede any asanas that bend the spine forward.
Mistakes to avoid
Often, people allow the body’s weight to be supported on the arms and heels in the final pose. Although this does not cause any harm, it dramatically reduces the efficiency of the asana. Another standard error is to tense the back muscles, which prevents maximum spine flexion. Try to relax the muscles as much as you are able. Do not breathe too deeply in the final position – the chest and abdomen are already stretched, restricting breathing. Any attempt to breathe deeply could easily strain associated muscles.